You might want to look into the classes offered by your local community college if you're interested in learning how to make ornaments. There are many crafts that you can choose from, including woodturning. A wooden spoon or bowl can be turned into a Christmas tree ornament. Here are some helpful tips for beginners. Finding a craft class that interests you is the first step. For instance, woodturning is a great choice if you like the look of intricate woodturning designs.
Dale L. Nish
Dale L. Nish was one of the most important woodturners in the United States. He has been teaching the art and demonstrating it to people for over 40 years. Woodturning, with Ray Allen, his most recent book is one of many. Dale L. Nish has also written Creative Woodturning. Artistic Woodturning is his other book. Mastering the Art of Woodturning is another.
Dale L. Nish shows you how to create beautiful and sculptural woodturned Christmas ornaments. This comprehensive guide includes color photographs, detailed plans, and expert tips on using templates. The book also includes ideas for ornaments from leading woodturning artisans. This book will help you make beautiful wood ornaments for your holiday tree.
Dick Sing
In this book, Dick Sing offers step-by-step instructions on how to make different types of wooden ornaments, from bowls to icicle spindles, to eggs. You will find a variety color photos throughout the book to help you navigate each project. There are also helpful tips and tricks for choosing the right woods. There will also be many ideas for Christmas gifts.
Dick started doing demonstrations at Racine's woodcuts, WI as an aspirant woodturner. His first demonstration brought a sweaty under his lathe. Soon Dick started receiving requests from craft shops, art shows and festivals all over the country to give demonstrations. A call came from a California craft club. The rest is history. Dick Sing has been teaching and demonstrating woodturning since 1989.
Acacia trio

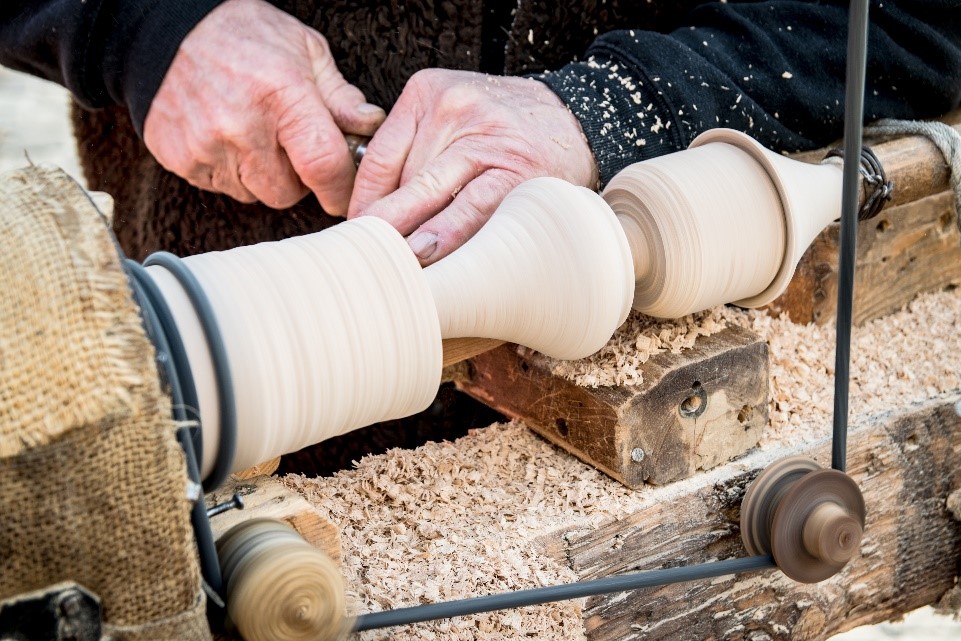
The Acacia trio of woodturning ornaments is a stunning ornament made of real sea urchin shells and turned ebony finials. Each piece is approximately 7 inches in length and hangs on monofilaments. You will need to use a drill and a small bit. Measure the ornament to be made. Next, mark the center of the square with a pencil. Next, slide a spur against the spindle. After you have the wood positioned, power on the lathe. Use a roughing tool to turn the wood. Next, use a parting knife to finish the job and add details to the ornaments.
Sputnik
An Sputnik Sea Urchin handturned ornate is a unique gift that will last a lifetime. The ornament is distinctive with its distinctive horn-like protrusions and wavy colors that are sure to catch the recipient's attention. The shell is designed to fit the finial made of maple or bloodwood. It is finished with multiple layers protective spray clear enamel. These space-themed ornaments can be used for any occasion and make great conversation pieces.
Visit the Met Opera Shop for wooden ornaments inspired from Sputnik chandeliers. Each ornament measures 3-1/2 inches in diameter, and is accompanied by a gold ribbon. You can either buy one or three ornaments. You can protect your ornaments with one or two of the sets, which include four Sputnik-themed ornaments. They will be shipped flat rate via USPS Priority Mail.
Acacia trio by Dale L. Nish
Dale L. Nish has been a major contributor to the woodturning industry for over three decades as an author, teacher and international speaker. He has presented his work more than 200 times and written many articles about the topic during his many travels. Here, he shares some of his best tips for creating ornaments, including a gallery of his favorite turners' work.
Acacia trio by Dick Sing
This book contains step by step instructions and color photographs showing how to turn Acacia trio woodturning ornaments. The book includes helpful tips and tricks for woodturners starting out, including how to select the right wood and use the appropriate tools. This book also has a tutorial for hollow, carved wood eggs. Grab a copy now to get started making these unique ornaments.
FAQ
Do you have any advice on how to start a woodworking business.
It's not easy to start your own woodworking business. It's worth it if you're passionate and willing to work hard. Plus, you'll probably enjoy the challenge of running your own business.
You should remember that unexpected issues may occur when you launch a new venture. Unexpectedly, money might run out. Or maybe you'll find that customers aren't willing to pay as much as you'd hoped. These situations are necessary for survival.
One tip is to have a separate banking account for your company. You'll know exactly how much money is coming in by setting up a separate bank account.
What is the difference in a hobbyist and professional woodworker?
Hobbyists enjoy making things out of wood, whereas professionals focus more on the quality of their work. Hobbyists take great pride in their creations, and share them with family and friends. Professionals will spend hours researching designs before they begin working on a project. They will pay attention to every detail, from selecting the best materials to finishing the project perfectly.
How long does a piece take to finish?
It all depends on what type of wood you use, how complex your design is, and how much finishing you use. For example, hardwoods require more maintenance than softwoods. Hardwoods are more expensive than other woods. But they last longer and resist moisture better. It takes between one and three months to finish a piece.
Statistics
- Woodworkers on the lower end of that spectrum, the bottom 10% to be exact, make roughly $24,000 a year, while the top 10% makes $108,000. (zippia.com)
- Average lumber prices rose about 600 percent between April 2020 and May 2021. (familyhandyman.com)
- Overall employment of woodworkers is projected to grow 8 percent from 2020 to 2030, about as fast as the average for all occupations. (bls.gov)
- The U.S. Bureau of Labor Statistics (BLS) estimates that the number of jobs for woodworkers will decline by 4% between 2019 and 2029. (indeed.com)
External Links
How To
How to stain wood
Staining wood is the process of applying chemicals to the wood's exterior, which alters its color. This chemical reaction changes the wood's color from white to brownish. The most common type of wood used for staining is oak, although many other types of wood can be stained.
You can apply wood stains in many different ways. Mixing the stain in a solvent such as turpentine and spraying it onto the wood is one method. Another method involves applying a solution of water to the wood. You can also mix stains with varnishes or paints so that they become part the finish coating.
Preparing the surface is the most important step in staining wooden surfaces. Cleaning the wood thoroughly removes any dirt or grease that could interfere with applying the stain. Sanding smoothens scratches and rough spots. You must then decide on the type of stain that you wish to use. There are two main kinds of stains available: non-penetrating stains and penetrating. Penetrating colors penetrate deeper into wood than those that are non-penetrating. This makes them more suitable for darker colors, such as mahogany. The best non-penetrating colors are those that work with light colors like maple.
Once you have decided on the stain type that you want, get your tools ready. A paintbrush works well for applying stains because it allows you to spread the liquid evenly across the surface. You should also have some handy rags to wipe up excess stains after you finish painting. If you plan on mixing the stain yourself make sure that you have enough containers to hold the different components.
After you have prepared the materials, you can clean the area where you want to stain the wood. Use warm water and soap to clean away dirt and dust. You can wipe down the entire furniture using a damp rag with clean water. If you intend to stain darker wood, make sure you get rid of any debris.
Next, apply the stain. Begin at one end and spray or brush the stain on the wood. Slowly and carefully move along the grain of wood, slowly but steadily, until you reach the other end. Keep the stain from dripping off the wood's surface. Before you proceed with the next steps, let the stain dry completely.
A coat of clear polyurethane sealing agent is applied to protect the paint. Three coats of polyurethane sealing agent are required. Allow the third coat to dry overnight before sanding the final coat.