If you're a beginner woodcarver, you might not be sure where to begin. Here are some tips for your first woodcarving project.
Dog
There are many free wood carving patterns that you can download for your dog if it's an aspiring woodcarver. These patterns will guide you in carving your dog in a variety of styles and dimensions. These are the tools you will need for carving your dog. A band saw or copingsaw, chisels and a mallet are all you will need. You also need some time to sharpen them. You're ready to start carving!
Eagle
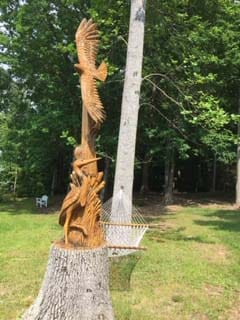
Native Americans regard the baldeagle as a traditional symbol for strength, courage, wisdom, and perseverance. It was about 20 inches across by five inches wide. Today, the eagle is a popular choice for wood carvings. There are many different wood options available for eagle carvings. This article will discuss some of the most well-known wood carving styles.
Bear
Carving a bear in wood is an easy project. It has several distinguishing lines and shapes. Each line is heavier than the previous. For extra visual interest, the front paws of bears are angled towards the legs to add interest. For those who are just starting out in wood carving, a book can help you create a bear. James Miller's book shows the entire process.
Elephant
An elephant wood carving adds character and beauty to any home. 1stDibs carries 56 antique wood elephants as well as two contemporary pieces. These pieces were made as early as the 19th-century and have grown in popularity over recent years. You can choose from Art Deco (Mid-Century Modern), Folk Art, or a smaller piece for a subtle addition to your home decor.
Moose

A moose is a wonderful animal to wood carve, whether you are looking to add antlers and/or create a stunning moose head. Dowels can be attached to antlers and paddles of the moose. These will need to be pushed in and possibly glued in place. The moose can be painted with a walnut gel stain and/or colored with paint.
Template for moose
Carvers can use a moose carving template to help them create realistic-looking carvings. Moose carvings are easy to paint and stain with walnut gel stain. After you've learned the basics it is simple to carve this creature. Add details such as fur and eyes using a brush or a die grinder's typhoon bits. The Moose template can be used by beginner wood carvers to create an animal.
Bear template
To begin a bear wood carving, you'll need a template. To explore the wood's features, you can use a Dremel to create a template. With this tool, you can use stop cuts to separate the legs from the lower body. To indicate where the legs will split, you could also make small V-cuts. After completing the ear and leg parts, you can round the underbelly. To shape the bear further, make sure you leave a little space at the rear.
Eagle template
Three templates are necessary to carve an Eagle. One of them is for the actual carving, the other will serve as your working paper template and will be cut off to transfer patterns. The third template is for reference. Then, you will use the tools available to cut out the main lines of the template. It is important to ensure that you align the lines with the pattern line. Make sure all marks are aligned.
Template for the mouse
For those who are new to wood carving, there are many options. This task will be easier if you use a template. You can also download patterns to assist you. A simple geometric pattern is a good starting point if you're just beginning. As you gain experience, you will be able to move on to more complex patterns. Once you have mastered the basics you will be able to create the perfect mouse.
FAQ
How do I know what type of wood I'm dealing with?
Always verify the label on wood purchases. It should have information about the wood species as well its moisture content and whether any preservatives were used.
How can I learn basic woodworking skills
A great way to start learning how to build furniture is by building a simple bench for yourself. You can use any wood you have in your home to complete this project. If you don't know what kind of wood to use, then go ahead and buy some cheap pine boards from Home Depot or Lowes. After you've constructed your bench you'll want sand all the rough edges off and varnish it.
Do I have the potential to make a decent living doing this?
Yes! In fact, many woodworkers already do. According to the U.S. Bureau of Labor Statistics in May 2012, the median annual income for woodworkers was $34,000 This is higher than the $31,000 annual national average.
Can I succeed in woodworking if I'm a genius?
No. Woodworking is not difficult. It is possible to learn basic tools and techniques that will allow you to create beautiful art.
Is it difficult to start my woodworking business?
It is difficult to start your own woodworking company. You will need to adhere to many legal requirements. This doesn't necessarily mean that you should go through all the work of setting up a company. Many people decide to join established businesses. You only need to pay membership and tax fees.
How long does it usually take to complete a piece furniture?
It depends on which wood you choose, how complicated your design is and what amount of finishing you apply. Hardwoods require more care than softwoods. Hardwoods are more expensive than other woods. But they last longer and resist moisture better. The typical time taken to finish a piece furniture takes anywhere from one to three month.
Where do I get my woodworking supplies?
There are many places where you will find everything that you need. You could also visit hardware stores in your area or shop online at Amazon.com.
You can also check garage sales and flea markets for old furniture and other materials you can reuse.
Statistics
- Overall employment of woodworkers is projected to grow 8 percent from 2020 to 2030, about as fast as the average for all occupations. (bls.gov)
- Most woodworkers agree that lumber moisture needs to be under 10% for building furniture. (woodandshop.com)
- In 2014, there were just over 237,000 jobs for all woodworkers, with other wood product manufacturing employing 23 percent; wood kitchen cabinets and countertop manufacturing employing 21 percent. (theartcareerproject.com)
- Average lumber prices rose about 600 percent between April 2020 and May 2021. (familyhandyman.com)
External Links
How To
How to stain wood
Staining wood refers to applying chemicals to wood's surface. This chemical reaction causes the wood to change in color. The wood will turn from white to brownish-red due to the chemical reaction. While oak is the most widely used type of wood for staining purposes, other types of wood are also available.
There are many ways to stain wood surfaces. One method involves mixing the stain and a solvent and then spraying it on the wood. Some methods involve a mixture of water and dye that is applied directly to the wood. The stain can be mixed with paints and varnishes to become part of the final coating.
Preparing the surface is the most important step in staining wooden surfaces. Clean the wood to get rid of any grease, dirt or other substances that might be detrimental to the stain's application. Sanding the wood removes scratches and imperfections. The next step is to choose the stain type you want. There are two types of stains that can be used: penetrating and non-penetrating. Penetrating and non-penetrating wood stains penetrate deeper than other types, making them perfect for dark colors like mahogany. Non-penetrating stains work best with light colors like maple.
You will need to decide on the type of stain you want to use, and then prepare your tools. Because you can spread the stain evenly with a paintbrush, it is ideal for applying them. You should also have some handy rags to wipe up excess stains after you finish painting. If you intend to mix the stain yourself you will need enough containers to hold all the components.
Once you have prepared all your materials, it is time to clean the areas where you will stain the wood. Use warm water and soap to clean away dirt and dust. You can wipe down the entire furniture using a damp rag with clean water. Be sure to get rid of all loose material, especially if staining is planned for darker wood.
Next, spray the stain. Apply the stain by brushing or spraying it onto one side of the furniture. Slowly and carefully work your way along the grain to reach the opposite end. Make sure that the stain does not drip off the edge of the wood. Allow the stain to dry completely before you move on to the next step.
To protect the painted surface, apply a coat of clear polyurethane sealant. Apply three coats polyurethane sealer. Allow the third coat to dry overnight, before sanding.