It is possible to create high-quality results by hand sanding wood. The best way to create a pleasing contour is to work slowly and check your progress frequently. A feel of the surface can also help you judge its progress. You can also use files and rips to shape wood by hand. These tools can make the process more enjoyable and relaxing. This article will help you learn about the different ways of shaping wood by hands. Then, try these techniques to shape wood by hand!
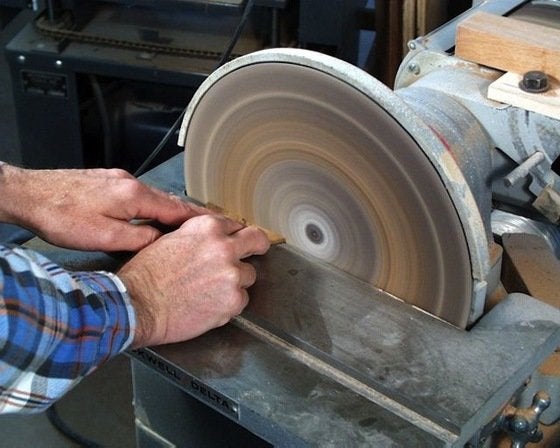
Sanding
Sanding wood by hand can be an old method of woodworking that will give your piece a beautiful finish. Sanding wood by hands can be as easy, or as hard, as you choose. A single piece of sandpaper can be used to create a steady sanding motion on the finished piece. You might also consider buying a sander if you have a complicated sanding task.

Filing
There are two primary methods for filing wood by hand. One uses a chisel-like filing device, while the other requires you to file the wood by hand. Both methods are effective, but one method is better for certain jobs. A chisel-like tool is useful for smoothing rough workpieces. However, a hand-held, file is better for shaping or altering details. A file was not needed in antiquity. Instead, smoothing was done by sharkskin and abrasive rock with a granular surface.
Dremel
Carving trees is one of your easiest projects with a Dremel. You will start by carving the base. This will serve as a guide to carving the leafy surface. Finish your project with sanding the wood. To carve a tree, you'll need a workbench and the appropriate attachments. You can rotate the Dremel's lock clockwise and counterclockwise. A wrench is also required.
Surform
Wood Plans are an essential tool for every serious woodworker. These tools remove unwanted material from a wooden surface. These tools are built on traditional techniques and can be a valuable addition to your toolbox. Here are some advantages to these tools:
Hewing
A saw is a sharp instrument that can be used to cut wood. Usually, an axe is used for this purpose. This process was once the standard way to square beams before the use of sawmills, and it is still occasionally used in timber framing. Wood conversion is done using hewn lumber. However, power tools are increasingly being used for the same purpose. Here are some tips to help you hone wood by hand.
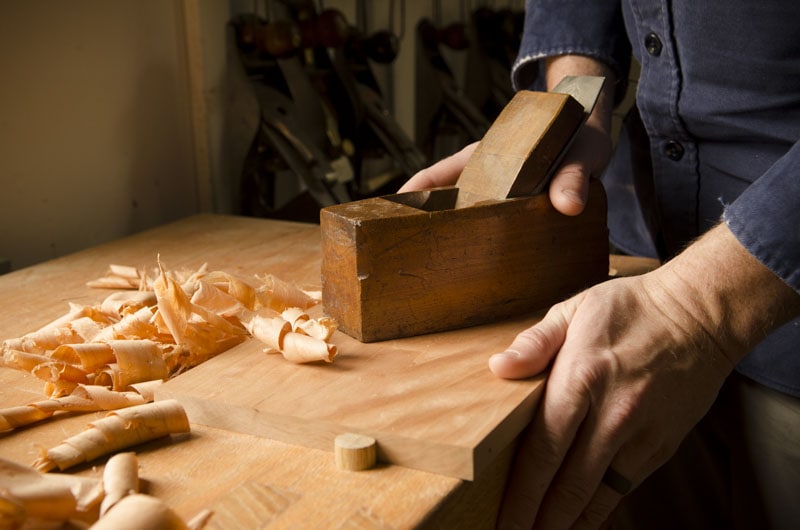
Planning
Many amateur woodworkers read books on fine woodworking and carpentry. These books extolled the virtues and benefits of hand-planing wood. The smooth, flat surface that can be achieved with a hand plane is said to be almost magical, requiring no further work before it can be finished. The versatility of the hand plane is also highlighted by the authors. The authors also highlight the versatility of the hand plane. But, is it really magical?
FAQ
How do I calculate woodworking prices
The most important thing to remember when calculating costs for any project is to keep them as low as possible. It is important to ensure that you are getting the best materials prices. You should also consider other factors that could impact the cost of your project, such as experience, skill level, time, and money. To get an idea about the average cost for common household DIY tasks, see our guide to the average woodwork project price.
How can a beginner woodworker make money?
Many people are looking to create their own furniture and start an internet business. There are other ways to make money if you're just starting out building furniture than selling on Etsy. You can sell at local craft fairs. A workshop could also be offered for people who are interested to learn how they can build their own furniture. Consider offering your services if you have previous experience as a builder or carpenter.
How long does it take you to finish a piece?
It all depends upon the size of your piece of furniture. A smaller project like picture frames or boxes can be completed in a single day. Larger projects, such as desks and dining tables, can take several days. It takes time and effort to properly stain the wood.
What's the difference between a hobbyist and a professional woodworker?
Hobbyists like making things with wood. Professionals focus more on quality. Hobbyists often take pride in the creations they make and often share them to family and friends. Professionals will spend hours researching designs before they begin working on a project. They will meticulously plan every detail of their work from choosing the right materials to finishing it.
How can I learn basic woodworking skills
Building a bench is a great way to get started in furniture building. You can use any wood you have in your home to complete this project. If you're not sure which kind of wood to choose, you can purchase cheap pine boards at Lowes and Home Depot. Once you have built your bench, you will need to sand it off and then finish it with a stain/varnish.
How long does it take for furniture to be finished?
It all depends on what type of wood you use, how complex your design is, and how much finishing you use. For example, hardwoods require more maintenance than softwoods. Hardwoods can also be more costly than softwoods. However, they are stronger and more resistant to moisture. Finishing furniture can take anywhere from one week up to three months.
Statistics
- The best-paid 10 percent make $76,000, while the lowest-paid 10 percent make $34,000. (zippia.com)
- In 2014, there were just over 237,000 jobs for all woodworkers, with other wood product manufacturing employing 23 percent; wood kitchen cabinets and countertop manufacturing employing 21 percent. (theartcareerproject.com)
- If your lumber isn't as dry as you would like when you purchase it (over 22% in Glen Huey's opinion…probably over 10-15% in my opinion), then it's a good idea to let it acclimate to your workshop for a couple of weeks. (woodandshop.com)
- Average lumber prices rose about 600 percent between April 2020 and May 2021. (familyhandyman.com)
External Links
How To
How to stain wooden surfaces
Staining wood can be described as a process where chemicals are applied to the wood surface. This causes the wood to take on a new color. This chemical reaction causes wood to turn from whiteish to brownish. While oak is the most widely used type of wood for staining purposes, other types of wood are also available.
There are several ways to apply stains to wood surfaces. Some methods include mixing the stain along with a solvent like turpentine and then applying the mixture to the wood by brushing or spraying. Another method involves applying a solution of water to the wood. The stain can be mixed with paints and varnishes to become part of the final coating.
Preparing the wood surface is the first step to staining it. Cleaning the wood thoroughly removes any dirt or grease that could interfere with applying the stain. Sanding the wood removes scratches and imperfections. You must then decide on the type of stain that you wish to use. There are two main types of stain: non-penetrating and penetrating. Penetrating stains penetrate deeper than non-penetrating stains, which makes them great for dark colors like mahogany. Penetrating stains are best paired with lighter colors, such as maple.
Once you have decided on the stain type that you want, get your tools ready. You can use a paintbrush to apply stains. This allows you spread the liquid evenly over the surface. You should also have some handy rags to wipe up excess stains after you finish painting. If you plan on mixing the stain yourself make sure that you have enough containers to hold the different components.
After you have prepared your materials, clean the area you intend to stain. You can remove grime and dirt with warm water and soap. Use a dampened rag and clean water to wipe the furniture. You should remove any debris, especially if your plan is to stain darker wood.
Next, apply the stain. Begin at one end and spray or brush the stain on the wood. Slowly and carefully move along the grain of wood, slowly but steadily, until you reach the other end. The stain should not drip off of the wood's edge. Before you proceed with the next steps, let the stain dry completely.
To protect the painted surface, apply a coat of clear polyurethane sealant. Three coats of polyurethane sealing agent are required. Allow the third coat, which should dry overnight, to dry before sanding.