You will need to research which woods are best for carving your walking sticks before you begin. You will also want to know about various techniques for whittling and what David Allen uses to carve his walking sticks. Be sure to check out these famous quotes on walking sticks and how they are made. These tips will help you make the perfect walking stick. Read on to learn more. You can now create a walking stick that is unique and functional!
Woods that are suitable for carving a walkingstick
Finding a straight blank is the hardest part of the whole process. There may be a few branches that are too bent to be of use, but it is worth searching until you find one. A straight branch can be harvested during winter when the sap is moving from the roots to the branches. This will make the wood more stable, and less likely to split. You can harvest the wood as soon as the tree is green, even if it is too late for the spring.
You can use a variety of wood species to carve a walking stick. North American Chestnut is a solid wood. Its density makes it ideal for making walking sticks and other similar tools. This wood grain is sometimes slightly open or slightly closed. This wood grain makes a strong walking tool that is solid and smooth. It is also very attractive and is used extensively in carving. You can carve some species with the bark still in place.
How to make a walking stick
There are several basic ways to carve walking sticks. First, select a piece wood with a distinctive texture. Woods can have unique bark patterns and colors. Other woods may have natural swirls. You might want to paint or lacquer these characteristics. To make it look more appealing, you could also carve the wood shaft. You should ensure that your stick is straight and free from branch shoots or tough spikes.
This book will tell you all about wood types and different carving styles. Most common are snakes and Lions. Not only can you carve snakes but fish, eagles, and even deer. Many people consider the skills of these artists to be God-given. This book is for both the beginner and the expert carver.
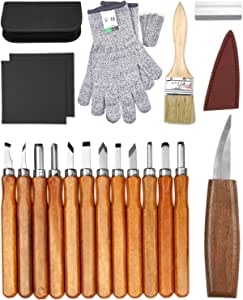
David Allen uses the following tools for carving a walkingstick
David Allen was just a small boy when he started to make toys with the pocketknife he had found under his house. It was too dangerous for him to use as a knife and he had it hidden from his family. His creations include toys such as slingshots and utilitarian items like shoeshine box. Allen was 15, when he became paralysed and began to make walking sticks. Allen worked with a pocketknife, a chisel and a chisel to carve the wood.
Allen created his designs alone, digging around the roots saplings to find out what to carve. He believed that a design needed to be "seemed" before it could carved. This was similar to the work of many African-American artists. Allen had many visions and dreams of the design he wanted. He was able create a stick which would invoke the emotions and feelings in his community.
Famous quotes about carving a walkingstick
Carving walking sticks is a complex task that requires a well-prepared blank. The most difficult part is to find a straight blank. You have many options, but it takes persistence to find one that is straight. You may find it bent beyond practical use. Keep searching until you find it. If possible, try to cut your stick during the winter when sap is flowing from the tree's branches to the root. The sap makes wood soften and less likely it to split.
Consider the wood's color and texture when you are choosing wood. Each piece of wood may have unique textures and colors. You can enhance the natural swirls by applying lacquer. A smooth finish is possible by choosing a wood shaft that is free from branch shoots and tough spikes. This will make it easier. No matter the material you choose you need to think about the finishing options you'll use.
FAQ
Which wooden items are very popular?
These wooden products are the most popular. They were made from sustainably harvested wood.
Oak, cherry and mahogany are the most sought-after wood types for furniture.
These woods not only have great strength, but also beautiful patterns and colors. They will last for many years, if taken care of properly.
To protect wooden furniture from moisture damage, you should paint it first. This applies to all surfaces including drawers, doors, handles, and handles.
You want your furniture to last as long as possible so you need to choose a paint that is water resistant.
Use a high-quality, oil-based primer and two coats of topcoat. You may need to apply several coats of top coat depending on how much wear it is expected.
Avoid spray cans and aerosol paints. These products are contaminated with solvents, which evaporate rapidly and can leave behind toxic fumes.
What should a woodworker be paid per hour?
The hourly rate for a professional woodworker varies depending on many factors, including skill level, experience, availability, location, and other variables.
An average hourly rate for skilled woodworkers ranges between $20-$50.
A less skilled woodworker can charge as low at $10 an hour.
How long does it take you to finish a piece?
It depends on the size and condition of the furniture. You can finish smaller projects, such as boxes or picture frames, in one day. Larger projects like dining tables and desks require several days. It takes time to stain and seal the wood properly.
Statistics
- Average lumber prices rose about 600 percent between April 2020 and May 2021. (familyhandyman.com)
- In 2014, there were just over 237,000 jobs for all woodworkers, with other wood product manufacturing employing 23 percent; wood kitchen cabinets and countertop manufacturing employing 21 percent. (theartcareerproject.com)
- Overall employment of woodworkers is projected to grow 8 percent from 2020 to 2030, about as fast as the average for all occupations. (bls.gov)
- Most woodworkers agree that lumber moisture needs to be under 10% for building furniture. (woodandshop.com)
External Links
How To
How to use a handsaw correctly
Hand saws are used for cutting wood into pieces. There are many types of handsaws: jigsaws and table saws; band saws; sabersaws; crosscut saws; miter saws; and rip-saws. A handsaw is a tool made of metal or plastic that cuts material like wood, plastics, metals and others.
Hand saws have the main advantage of cutting at precise angles without needing to adjust the blade. They are also easy to sharpen, unlike power tools. However, there are some disadvantages as well. You must be careful when transporting them, as they can be heavy and bulky. You could also injure your self if you don't know how to use them.
There are many ways to hold a handheld saw. While cutting, keep your fingers away from the blades. If you don't, you might get hurt. You should hold the saw with your fingers close to the handle. Your thumb should be at the top of your blade. This way, you won't accidentally touch the blade.
When using a hand saw, you should never put anything under the piece of wood you're cutting. The blade could slip if you do this. Before you begin cutting, make sure to inspect the area. Make sure there are no nails, screws or other objects under the wood.
Always wear safety glasses when you use a handsaw. They protect your eyes from dust, which makes it easier to see what is happening. Safety glasses are also useful because they protect your face from flying debris.
Before you start working with a saw, it is important to learn how to use it safely. After that, practice until it becomes comfortable enough to start cutting. You'll soon be able to cut any item once you have mastered the basics.