
The many benefits of using a disk-sander include its fast finish and mitre gauge. Although these sanders are less portable than other models, they still provide the same high quality finish. You can find one that best meets your needs, and read on to discover more. Here are the top benefits of a disc sander. A sander that incorporates both sanding methods is the best option.
Disk sanders are used for face sanding
Disk sanders can be used as versatile sanding instruments. The rotating disk is supported by an aluminum- or steel backing plate and spins up to sand the material's surface. The washer and center screw of the disc are hidden from view and do not extend into the work area. Benchtop disk-sanders are equipped with adjustable worktables to allow for miter slots and end cutting. The disc diameters range from 4 to 8 inches. Larger models can be ordered with capacities up to 12 inches.
They provide fast finishes
When it comes to speed, disk sanders are an excellent option. Disk sanders come in a variety of sizes ranging from hobby machines to industrial giants. Most home shops use a 12 inch disk. The disks are usually made from pressure sensitive adhesive material. A disc sander can be a great investment if you are working on a project that requires a smooth finish quickly.
They are more compact than other sanders
A disc sander, a hand tool for smoothing small or thin cuts, is a hand tool. They are also less portable than other disc sanders. While they may not be as portable as some other sanders these sanders are still very useful for many hand jobs such as sanding plastic, wood and metal. They can be used to sand small and large objects, and they are very affordable. They are excellent for shaping and smoothing many types of materials.
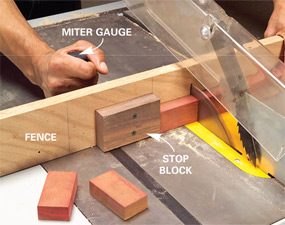
They also have a mitre gage
A disk sander offers many benefits, including a mitre gage. First, this feature guides the workpiece against the disc, avoiding tearout. Then, it extends the fence height, protecting your fingers from the blade's edge. Lastly, you can lock in the miter gauge with a clamp. Bernard Lewan shared the following tip. Here's how to do it.
They feature an adjustable table
Setting the table's height or tilt is the first step to using a disk-sander. If you have a table that has an adjustable height, ensure that the workpiece does not extend beyond the table. If it doesn’t, the workpiece might hit the sanding plate. Make sure to check all controls on the table including the powerplant, carriage, table height and quill lock. You can also add a miter gauge extension if you require more support.

They have dust ports
The dust collector housing is used to house the disk sander. The entire dust collector housing surrounds and exposes the workpiece. The dust collector housing must be removed and the front part of the sander should be exposed to expose the disc. A hex wrench34 can be used to quickly release bolt 90. To fix the bed 16 vertically in its position, bolt 90 must be tightened.
FAQ
How much should a hobbyist invest to get started?
A lot of capital is required to purchase the necessary supplies and tools if you want to start your own woodworking shop. The best place to start is by buying a small drill press, circularsaw, circular saw or sanding machine. These items won't break the budget and aren't expensive.
What is the minimum amount I will need to start?
Because each project is unique there are no exact numbers. But if you want to get an idea of how much money you'll need, consider these factors:
-
Materials cost
-
Tools and equipment
-
Time spent working on this project
-
The hourly rate
-
What profit are you expecting to earn?
-
No matter if you are looking to hire someone
If you're just starting out, you may decide to start small by making simple items such as boxes and picture frames. You'll become more proficient as you get experience.
How long does it take to finish a piece of furniture?
It depends on the type and complexity of your design as well as the amount of finishing that you use. Hardwoods, on the other hand, are more durable than softwoods. Hardwoods can also be more costly than softwoods. But they last longer, and resist moisture better. The typical time taken to finish a piece furniture takes anywhere from one to three month.
How do you calculate woodworking prices?
Remember to keep costs as low as you can when calculating project costs. Always make sure you get the best price on materials. You should also consider other factors that could impact the cost of your project, such as experience, skill level, time, and money. Our guide to the average household DIY task price will give you an idea of how much it costs to complete different types of woodwork projects.
Is it possible to learn woodworking by yourself?
Learning by doing is the best way of learning anything. Woodworking is an intricate art form that requires practice, skill, patience, and experience. Any craft requires patience to master.
To actually learn something is the best way. Start small, and work your way up from there.
Statistics
- The U.S. Bureau of Labor Statistics (BLS) estimates that the number of jobs for woodworkers will decline by 4% between 2019 and 2029. (indeed.com)
- Average lumber prices rose about 600 percent between April 2020 and May 2021. (familyhandyman.com)
- The best-paid 10 percent make $76,000, while the lowest-paid 10 percent make $34,000. (zippia.com)
- Woodworkers on the lower end of that spectrum, the bottom 10% to be exact, make roughly $24,000 a year, while the top 10% makes $108,000. (zippia.com)
External Links
How To
How to make wood joints
This tutorial will demonstrate how to join two pieces together of wood. We will use the pocket hole joint, which is drilling holes in the wood to join them. This works well if the wood is straight and smooth. You might consider dowel joinery if your wood isn’t straight or flat. These are the steps
-
Drill Pocket Hole Joints. To start, measure and mark where you want to put the pocket hole joint. You will then drill 3/4" deep holes through each piece of wood with a jigsaw, handheld drilling machine, or hand-held drill.
-
Sand Smooth. The wood's edges can be sanded to prevent splitting.
-
Glue Together. Apply glue to the sides of both wood. Let the wood sit for 5 minutes, then clamp it together.
-
Attach the Pieces together. Once the glue has dried, clamp the pieces together so they are flush.
-
Trim Joinery. After the glue dries completely, trim off any excess wood around the joint.
Allow enough space between pieces so you can turn them inside out.